wearables · free-pattern · beginner · 5 min read
Crochet Dog Bandana Pattern (Sized From Your Dog's Collar)
A dog bandana is a triangle and a tie, which makes it one of the few crochet garments where "sizing" doesn't mean a gauge swatch and a chest measurement — it means counting rows until the triangle looks about right, then trying it against the actual dog. If it needs to be bigger, add a row. If it needs to be smaller, stop a row early. That's the whole sizing system.
Abbreviations
- ch — chain
- dc — double crochet
- st(s) — stitch(es)
- sk — skip
Materials
- Worsted weight cotton or cotton-blend yarn (cotton holds its shape better than acrylic on something that'll get chewed on) in any color
- 5.0mm (US H-8) hook
- Yarn needle
Sizing guide
Since this pattern grows diagonally rather than to a fixed measurement, size by row count rather than a fixed pattern:
| Dog size | Approx. rows before border |
|---|---|
| Small (Chihuahua, Yorkie) | 10–12 rows |
| Medium (Beagle, Corgi) | 14–16 rows |
| Large (Labrador, Shepherd) | 18–22 rows |
Try the growing triangle against your dog's neck every few rows once you're in the size range that looks close — it's far easier to check as you go than to guess and re-do it.
The bandana, corner to corner
This uses the corner-to-corner (C2C) technique: you start at one point of the triangle and grow it diagonally, one small block at a time, rather than working straight rows across a fixed width.
Row 1. Chain 6. Dc in the 4th chain from the hook, then dc in each of the next 2 chains. That's your first block. (1 block)
Row 2. This row adds one new block and turns the existing block into a second one. First, start the new block: chain 6, turn, dc in the 4th chain from the hook, then dc in the next 2 chains. Next, join to the previous block: slip stitch into the top corner of Row 1's block. Finally, build a second block on top of that same corner: chain 3, then work 3 dc into the same space you just slip-stitched into. (2 blocks)
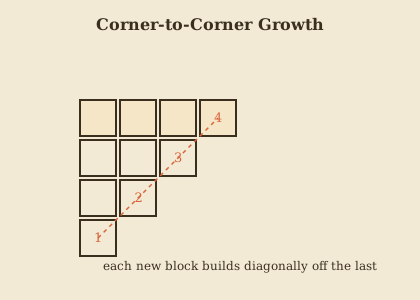
Row 3 onward. Each row follows the same two-part pattern as Row 2, just with one more existing block to work across. Start every row the same way: chain 6, turn, dc in the 4th chain from the hook, dc in the next 2 chains — that's the new block for this row. Then work across the row toward the point: for each existing block from the previous row, in order, chain 3 and work 3 dc into that block's corner space, adding one more block each time. Each full row gains exactly one block over the row before it, so a row with 3 existing blocks finishes with 4 blocks total. Continue this way until you've reached the row count for your dog's size from the table above — the triangle should be visibly widening by one small square each row as you go.
Border row (optional but recommended). Work 1 row of single crochet evenly around the two straight edges of the triangle (skip the point) for a cleaner, more finished edge that resists curling.
The tie
Work the tie in two separate steps, one for each side. First, attach yarn at one of the two top corners of the triangle (the ends of the longest edge, not the point) and chain 40–50, checking the growing chain against your dog's actual neck as you go rather than counting to a fixed number. Fasten off once it's long enough to tie in a bow or knot comfortably. Then repeat the same step at the second top corner: attach yarn, chain to a matching length, and fasten off. Weave in all four ends (two from the ties, plus the starting and ending tails from the body) once both ties are complete.
Fit and safety notes
Always tie loosely enough to fit two fingers between the tie and your dog's neck, and never leave a bandana on an unsupervised dog — the same chain-tie that makes this pattern quick to put on is not something that reliably breaks away under pressure the way some manufactured safety-clasp bandanas are designed to. Cotton yarn holds up to washing far better than acrylic if the bandana is going to see regular wear.
For a matching wearable made with the same double crochet the corners of this bandana are built from, the double crochet tutorial is the stitch this whole pattern leans on. Making one for yourself too? The hair bandana / headscarf pattern is a different triangle built for a hairline instead of a neck, sized to match.
Frequently Asked Questions
Will a crocheted bandana stretch out of shape on an active dog? Cotton or a cotton-blend yarn resists stretching far better than acrylic under the pulling and chewing a bandana gets from daily wear. If you notice sagging after a few wears, a quick hand wash and reshape while damp restores most of the original shape.
Can I make this bandana without knowing corner-to-corner (C2C)? Yes — C2C is explained in full in the pattern itself, and it's genuinely one of the easier techniques to pick up mid-project since every row follows the identical one-block-added pattern.
How do I know what size to make for my specific dog? Measure around the base of your dog's neck where a collar normally sits, then check that measurement against the row-count sizing table in the pattern. When in doubt, size up slightly and rely on the tie length to take up any slack — an overly wide bandana ties down; a too-narrow one doesn't stretch to fit.
Keep going
- 01Crochet Bucket Hat Pattern (Adult Sizes, One Skein)The rounded crown, straight sides, and flared brim that make a bucket hat instantly recognizable — worked flat-to-flare in single crochet, with the stitch counts spelled out so it actually turns out symmetrical.wearables6 min read
- 02Crochet Wrist Warmers Pattern (Ribbed, One Skein, Both Sizes)A stretchy ribbed rectangle, seamed into a tube with a gap left for the thumb — the layering piece that's trending everywhere this year, worked flat so there's no in-the-round thumb gusset math to fight with.wearables5 min read
- 03Easy Crochet Slippers Pattern (Adult Sizes)No shaping, no sizing charts — just two rectangles folded and seamed into a slipper, sized against your own foot instead of a generic chart that never quite fits.wearables5 min read