amigurumi · free-pattern · 5 min read
Amigurumi Bunny Pattern (Beginner Friendly)
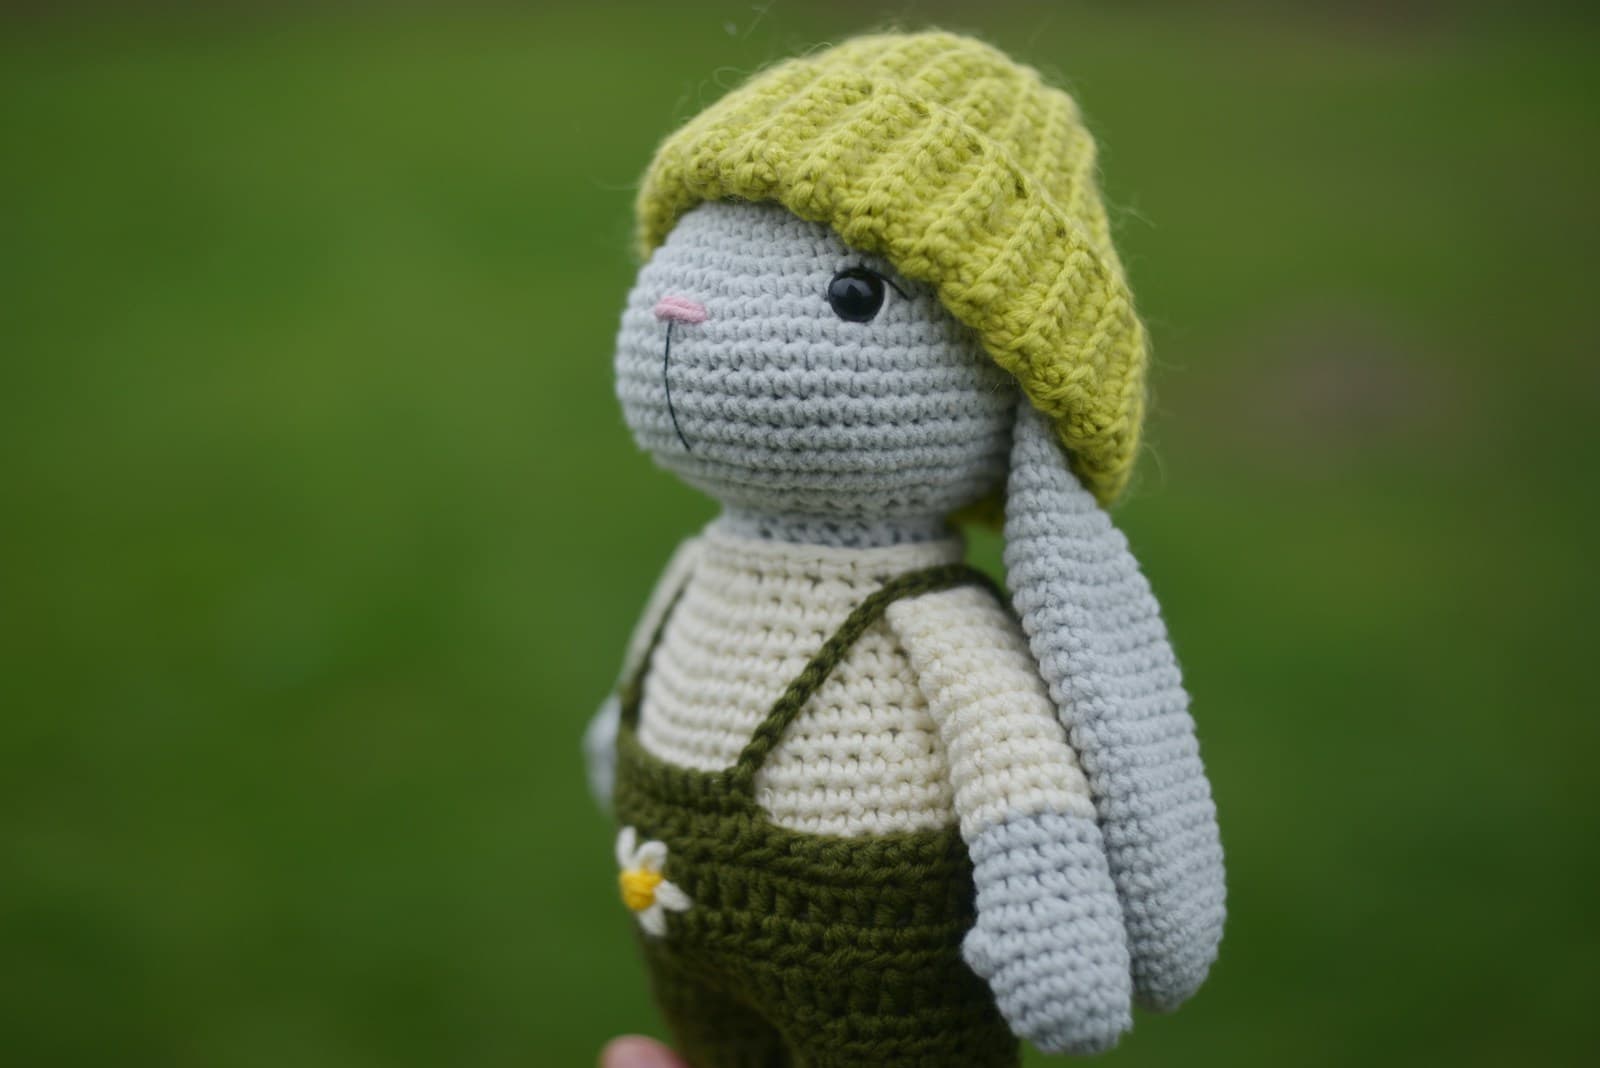
This bunny works up in an afternoon and only uses single crochet and basic increases/decreases, which makes it a great first amigurumi project.
Materials
- Worsted weight yarn (main color + small amount of pink for the ears)
- 3.5mm crochet hook
- Stitch marker
- Polyester fiberfill
- Yarn needle
- Small amount of black yarn or safety eyes for the face
Abbreviations
- sc — single crochet
- inc — increase (2 sc in same stitch)
- dec — invisible decrease
- st(s) — stitch(es)
Head (make 1)
- Magic ring, 6 sc into ring (6)
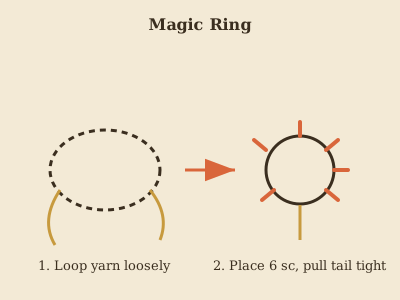
- Inc around (12) — work 2 sc into each of the 6 stitches from round 1, doubling the count.
- sc, inc around, repeating (18) — sc in the next stitch, then 2 sc in the following stitch, and repeat that pair all the way around.
- sc 2, inc around, repeating (24) — same pattern, but sc across 2 stitches before each increase this time.
- sc around, no increases (24), repeat for 5 rounds — plain single crochet in every stitch for these rounds, which builds height rather than width; the head should start looking like a rounded ball by the end of them.
- sc 2, dec around, repeating (18) — sc across 2 stitches, then work an invisible decrease over the next 2 stitches to join them into one.
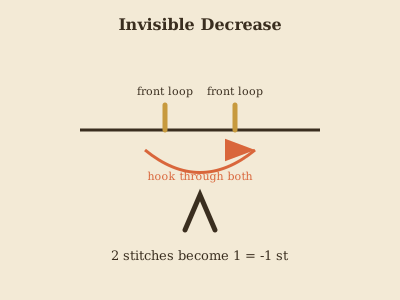 11. sc, dec around, repeating (12) — stuff firmly here, while the opening is still wide enough to pack fiberfill in evenly.
12. dec around (6) — decrease every remaining stitch pair; the small opening left should close easily with the tail.
11. sc, dec around, repeating (12) — stuff firmly here, while the opening is still wide enough to pack fiberfill in evenly.
12. dec around (6) — decrease every remaining stitch pair; the small opening left should close easily with the tail.
Fasten off, leaving a long tail to close the top.
Body (make 1)
Work rounds 1-4 the same as the head, then work 6 more rounds even (24 sts) — this stretches the body into a taller, cylinder-like shape before any shaping starts at the bottom. Decrease the same way as the head's rounds 10-12, and stuff before closing so the body holds its shape once it's sewn on.
Ears (make 2)
- Magic ring, 6 sc into ring (6)
- Inc around (12) — 2 sc into each of the 6 stitches, doubling the count for the ear's base.
- sc around, no increases (12), repeat for 4 rounds — plain single crochet with no shaping, so the piece grows into a long, even tube.
Flatten and sew to the top of the head, angled slightly outward.
Assembly
Sew the head to the body, attach the ears, and add the face with a small amount of black yarn or safety eyes. Position the head so it sits square on the body's flat top rather than tilted to one side — pin it in a few spots first and check from directly above before committing to the sewing. That's it — you have a bunny.
Photos coming soon — check back once this pattern has a full step-by-step gallery.
Dressing your bunny
A finished bunny reads as a much more complete gift with a small outfit added — this is also the easiest way to personalize an otherwise plain amigurumi. A simple pair of overalls is just two small rectangles of contrasting yarn worked in single crochet, seamed up the sides and over the shoulders with two thin straps, then slipped onto the finished bunny and tacked in place with a few stitches so it doesn't slide. A small hat is the mini amigurumi ball's magic-ring start, worked for 2–3 rounds instead of finished into a sphere, then folded into a brim and sewn to the top of the head. Neither addition changes anything about the bunny pattern itself — both are separate small pieces added afterward.
Common fit and shape issues
The ears look floppy instead of standing up. This is usually intentional in this pattern — the ears are flattened rather than stuffed, which gives a soft, floppy-eared look. For ears that stand upright instead, work a few rounds of stuffing into the base of each ear before flattening the tip, which gives them enough structure to hold a more alert angle.
The body is noticeably bigger or smaller than the head. Double-check both pieces used the same rounds of increases (rounds 1–4 identical between head and body) — a common transcription slip is accidentally adding or skipping an increase round on one piece but not the other.
Ready for a second amigurumi project? The amigurumi doll pattern swaps the ears and limbs here for a sewn-on hood — a different shape to practice, similar afternoon of work.
Frequently Asked Questions
How much yarn does this bunny use in total? Roughly 60–70g of the main color plus a small amount of pink for the ears — small enough that most crocheters already have enough in their stash without a dedicated yarn trip.
Can I make this bunny without safety eyes? Yes — embroidered eyes with black yarn or floss work just as well and are the safer choice for a toy meant for a very young child, since they can't come loose the way a safety eye's washer occasionally can.
Why does my bunny's head look lopsided? Uneven stuffing is the most common cause — stuff a little at a time and check the shape from multiple angles as you go, rather than packing it all in at once right before closing the final round, when it's harder to redistribute evenly.
Keep going
- 01Crochet Raccoon Pattern (Amigurumi, 7–8in)A bottom-up body with a built-in cream belly stripe, a striped tail worked in alternating color bands, and oval eye masks made from a foundation chain instead of a magic ring — more construction variety than most first amigurumi projects.amigurumi10 min read
- 02Crochet Panda Pattern (Sitting Amigurumi, 18–20cm)A bigger, more detailed panda than most beginner patterns — a two-tone head with eye patches, a separate nose, and toe-pad paws that make it sit up on its own. Single crochet throughout, worsted weight yarn.amigurumi11 min read
- 03Crochet Penguin Pattern (Beginner Friendly, Chenille Yarn)A soft, plush penguin made in chenille yarn instead of the usual worsted cotton — the head and body work as one continuous piece, so there's no seam down the middle to line up.amigurumi9 min read