amigurumi · free-pattern · 7 min read
Simple Amigurumi Doll Pattern (Beginner Friendly)
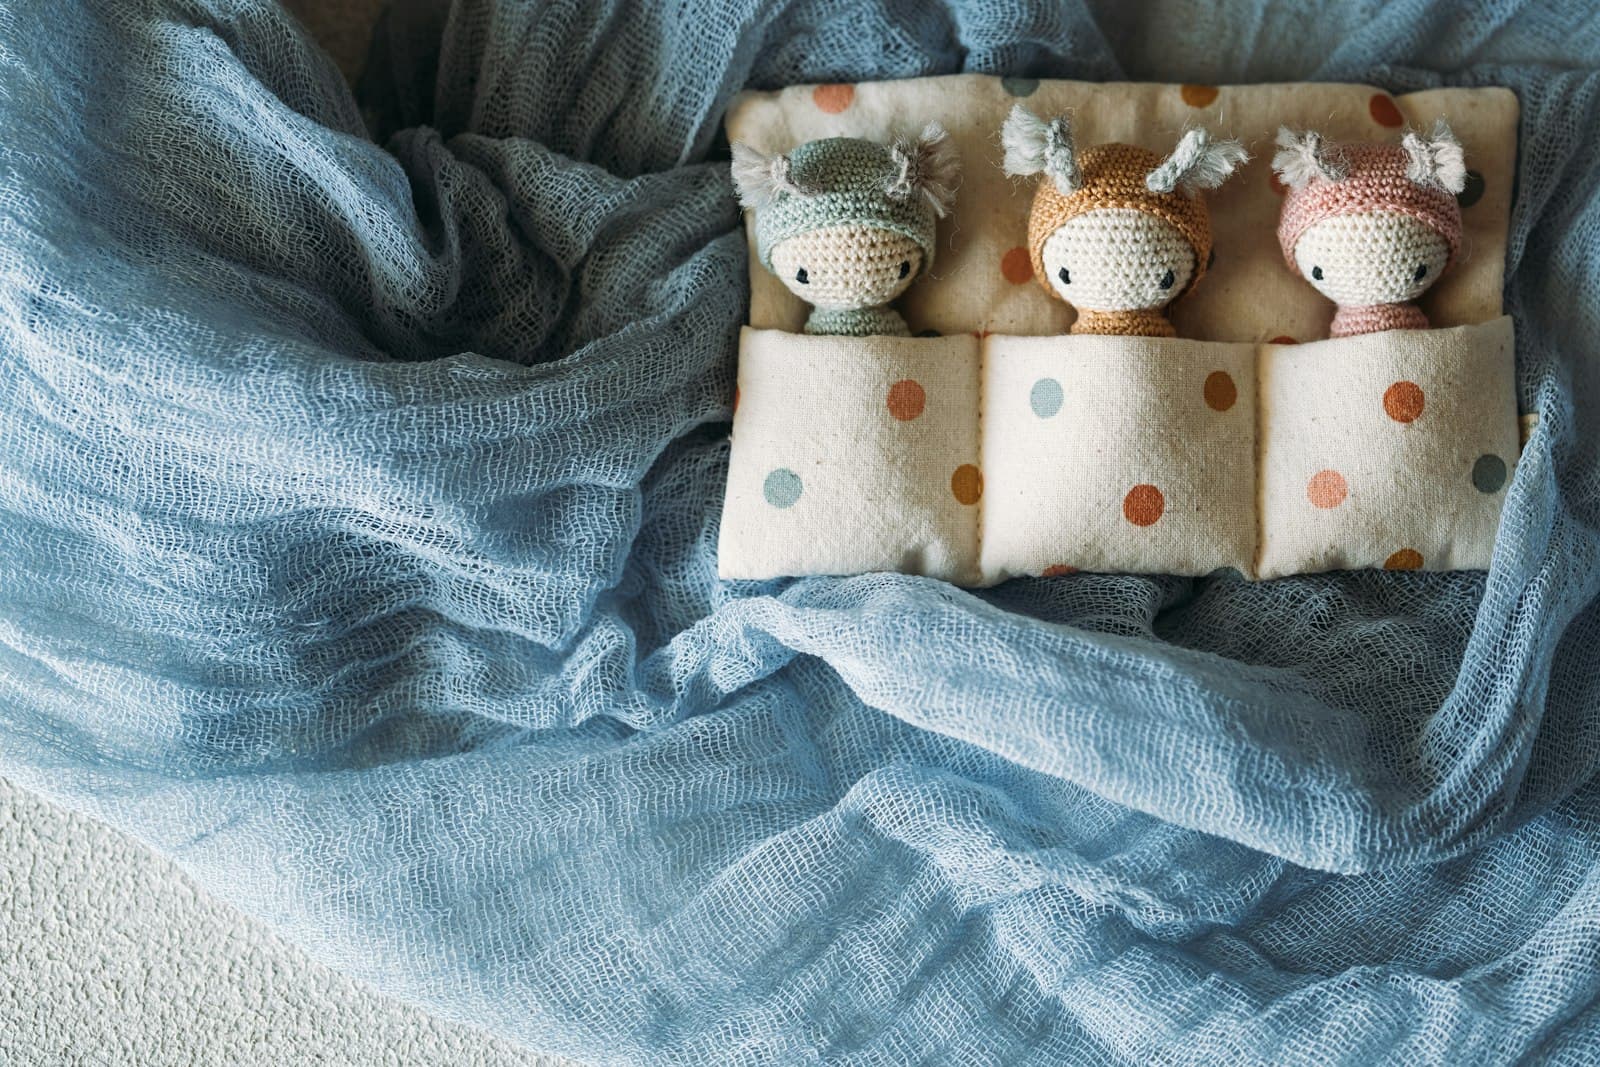
This little doll is built from two shapes — a stuffed ball for the head and body, and a simple hood worked separately — which makes it a friendlier second amigurumi project than something with arms and legs to attach. If the amigurumi bunny was your first plushie, this one trades limbs for a hood you can crochet in half the time.
Abbreviations
- sc — single crochet
- inc — increase (2 sc in same stitch)
- dec — invisible decrease
- st(s) — stitch(es)
Materials
- Worsted weight yarn in a main color (body) and a second color (hood)
- Small scraps of yarn or embroidery floss for a simple face
- 3.5mm crochet hook — see the magic ring tutorial for the start every round below uses
- Polyester fiberfill
- Yarn needle
- Stitch marker
Body (make 1, main color)
- Start with a magic ring, then work 6 sc into the ring. Pull the tail to close it before moving on. (6 sts)
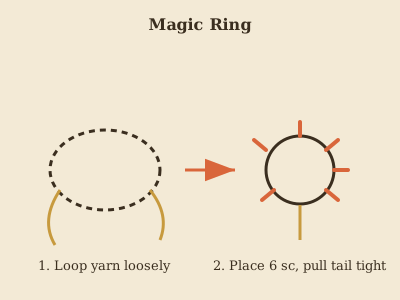 2. Work an inc (2 sc) in every stitch around — that's 6 increases spread evenly around the round. You should end with double the stitches you started with. (12)
3. Work the repeat sc, inc around: single crochet in the next stitch, then 2 sc in the following stitch, and keep that two-stitch pattern going all the way around. (18)
4. Work the repeat sc 2, inc around: single crochet in the next 2 stitches, then 2 sc in the following stitch, repeating all the way around. By now the increases are spaced further apart, which is what starts rounding the ball out rather than making it flare like a cone. (24)
5–10. Work 6 full rounds of plain sc around with no increases, keeping the stitch count at 24 every round. This straight section is what gives the head its rounded shape once stuffed — check your count at the end of each of these 6 rounds so a stray increase or skipped stitch doesn't sneak in unnoticed. (24, unchanged for all 6 rounds)
11. Start shaping back down: work the repeat sc 2, dec around, meaning single crochet in the next 2 stitches, then work an invisible decrease (the next 2 stitches worked together as 1, per the abbreviations above) in the following spot, repeating around. Begin stuffing firmly now, before the opening gets too small to pack fiberfill into easily. (18)
2. Work an inc (2 sc) in every stitch around — that's 6 increases spread evenly around the round. You should end with double the stitches you started with. (12)
3. Work the repeat sc, inc around: single crochet in the next stitch, then 2 sc in the following stitch, and keep that two-stitch pattern going all the way around. (18)
4. Work the repeat sc 2, inc around: single crochet in the next 2 stitches, then 2 sc in the following stitch, repeating all the way around. By now the increases are spaced further apart, which is what starts rounding the ball out rather than making it flare like a cone. (24)
5–10. Work 6 full rounds of plain sc around with no increases, keeping the stitch count at 24 every round. This straight section is what gives the head its rounded shape once stuffed — check your count at the end of each of these 6 rounds so a stray increase or skipped stitch doesn't sneak in unnoticed. (24, unchanged for all 6 rounds)
11. Start shaping back down: work the repeat sc 2, dec around, meaning single crochet in the next 2 stitches, then work an invisible decrease (the next 2 stitches worked together as 1, per the abbreviations above) in the following spot, repeating around. Begin stuffing firmly now, before the opening gets too small to pack fiberfill into easily. (18)
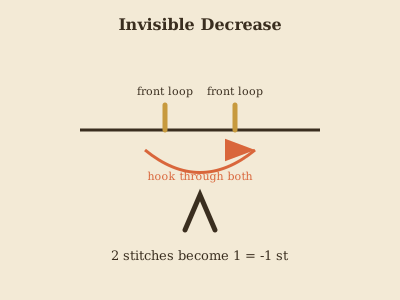 12. Continue shaping: work the repeat sc, dec around — single crochet in the next stitch, then decrease in the following stitch, repeating around. Add a bit more stuffing here if the shape still feels soft. (12)
13. Work a decrease in every stitch around, with no plain stitches between them. The opening will shrink fast on this round, so add any last stuffing before you finish it. (6)
12. Continue shaping: work the repeat sc, dec around — single crochet in the next stitch, then decrease in the following stitch, repeating around. Add a bit more stuffing here if the shape still feels soft. (12)
13. Work a decrease in every stitch around, with no plain stitches between them. The opening will shrink fast on this round, so add any last stuffing before you finish it. (6)
Fasten off, leaving a long tail. Thread the tail onto a yarn needle, then weave it through the front loops of the remaining 6 stitches one at a time, going around the small opening once. Pull the tail firmly to cinch the hole fully closed, then take the needle down through the center of the piece and out the far side before trimming, to anchor and hide the tail.
Hood (make 1, second color)
- Start with a magic ring, then work 6 sc into the ring and pull the tail to close it. (6 sts)
- Work an inc (2 sc) in every stitch around, doubling the stitch count. (12)
- Work the repeat sc, inc around: single crochet in the next stitch, then 2 sc in the following stitch, all the way around. This is the last increase round, so the hood's widest point is set here. (18) 4–7. Work 4 full rounds of plain sc around with no increases, keeping the count at 18 every round. This straight section is the depth of the hood, so check your stitch count at the end of each round to keep the edge even. (18, unchanged for all 4 rounds)
Fasten off, leaving a long tail for sewing.
Assembly
Place the hood over the top third of the head and pin it in place — it should sit like a snug knit cap, covering the top and sides but leaving the face open. Check it from above before you sew: the hood's edge should form an even circle around the face opening, not sit closer to one side. Using the tail, whip-stitch the hood's bottom edge to the body around the opening, working one stitch at a time and checking every few stitches that the hood hasn't shifted, since it's easier to catch drift early than to unpick it later. Weave in the remaining tail through several stitches on the inside of the piece so it can't work loose.
Add a simple face with small stitches of dark yarn or embroidery floss — two straight stitches for eyes and a short curved stitch for a smile sit well below the hood's edge. Keep the face minimal; a plain round head with just eyes reads as friendly and is far easier to get symmetrical than an embroidered nose and mouth.
Making it your own
- Ears or antennae: two small magic-ring circles (4 sc, no increases, 2 rounds) sewn to the top of the hood turn this into a simple animal doll — the exact idea behind the three dolls pictured above, each with a different hood color and a pair of small tufted ears.
- A face variation: safety eyes instead of embroidered ones give a slightly more polished, toy-store finish, though embroidered features are safer for anything intended for a very young child.
- Sizing up: working the same rounds in a bulkier yarn and larger hook produces a bigger doll without changing a single instruction — just expect it to use noticeably more stuffing and yarn.
This pattern is intentionally close to the magic ring tutorial's own round counts, so if you worked through that tutorial as practice, the body here will already feel familiar. For a third amigurumi with actual limbs and two-color piecing, the amigurumi panda is the next step up.
Frequently Asked Questions
Can I make this doll bigger for an older child? Yes — working the same round counts with a bulkier yarn and a larger hook (5.0–6.0mm) scales the doll up proportionally without any changes to the instructions, though it will use noticeably more yarn and stuffing.
What's the safest way to add a face for a baby or toddler? Embroidered features (small straight stitches for eyes, a curved stitch for a smile) are the safest option for very young children, since they can't come loose the way a safety eye's backing occasionally can if not seated and glued firmly.
Why is my hood not sitting centered on the head? Pin the hood in place with several pins spaced evenly around before sewing, and check it from directly above the head (not just from the front) to confirm it's centered — a hood pinned only at the front and back can twist to one side without it being obvious until you're partway through sewing.
Keep going
- 01Crochet Raccoon Pattern (Amigurumi, 7–8in)A bottom-up body with a built-in cream belly stripe, a striped tail worked in alternating color bands, and oval eye masks made from a foundation chain instead of a magic ring — more construction variety than most first amigurumi projects.amigurumi10 min read
- 02Crochet Panda Pattern (Sitting Amigurumi, 18–20cm)A bigger, more detailed panda than most beginner patterns — a two-tone head with eye patches, a separate nose, and toe-pad paws that make it sit up on its own. Single crochet throughout, worsted weight yarn.amigurumi11 min read
- 03Crochet Penguin Pattern (Beginner Friendly, Chenille Yarn)A soft, plush penguin made in chenille yarn instead of the usual worsted cotton — the head and body work as one continuous piece, so there's no seam down the middle to line up.amigurumi9 min read