amigurumi · free-pattern · beginner · 11 min read
Crochet Panda Pattern (Sitting Amigurumi, 18–20cm)
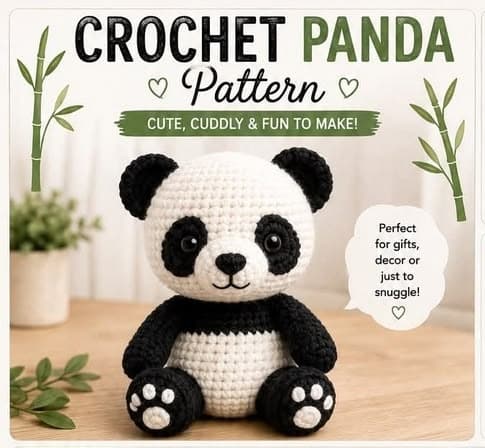
This panda finishes at 18–20cm (7–8in), sitting upright on paws with white toe pads — noticeably bigger and more detailed than the smaller amigurumi panda on this site. The extra size comes from worsted weight yarn worked at a slightly larger gauge, and the extra detail comes from two pieces the smaller version skips: a separate crocheted nose instead of an embroidered dot, and toe pads stitched onto every paw. Every color change still happens between pieces, not mid-round, so there's no color-work technique to learn — just more pieces to keep track of.
Abbreviations
- mr — magic ring
- ch — chain
- sc — single crochet
- inc — increase (2 sc in next stitch)
- dec — decrease, invisible (sc2tog)
- sl st — slip stitch
- st(s) — stitch(es)
- ( ) — work the instructions inside the parentheses into the same stitch
- [ ] — repeat the instructions inside the brackets the number of times given
Materials
- Worsted weight yarn in white and black
- 4.0mm (US G/6) crochet hook
- Safety eyes, 10mm
- Black yarn or embroidery floss, for the nose and mouth
- Polyester fiberfill stuffing
- Yarn needle
- Stitch marker
- Scissors
Head (white)
Work in continuous rounds — don't join or turn between rounds, just keep spiraling. A stitch marker in the first stitch of each round keeps you from losing your place, which matters more here than on smaller pieces since this head runs 17 rounds.
- Magic ring, 6 sc into the ring. (6)
- Inc around. (12) — work 2 sc into every stitch from round 1, doubling the count.
- (sc, inc) x 6. (18) — sc in one stitch, then 2 sc in the next, and repeat that pair six times around.
- (2 sc, inc) x 6. (24) — sc across 2 stitches before each increase.
- (3 sc, inc) x 6. (30) — sc across 3 stitches before each increase; the dome shape should be clearly curving by now.
- (4 sc, inc) x 6. (36) — one more increase round widens the head to its full diameter. 7–12. Sc around with no increases. (36) — repeat for 6 rounds straight. This is where the head grows in height rather than width, building the rounded shape a panda's face needs.
- (4 sc, dec) x 6. (30) — sc across 4 stitches, then work an invisible decrease over the next 2 stitches to merge them into one. Repeat six times.
- (3 sc, dec) x 6. (24)
- (2 sc, dec) x 6. (18)
- (sc, dec) x 6. (12)
- Dec around. (6) — decrease every remaining stitch pair.
Fasten off, weaving the tail in through the last stitches to close any gap. Insert the safety eyes between rounds 8 and 9, spaced about 6 stitches apart, before you finish stuffing — the head needs to be firm enough at the front to hold the eye posts snugly, but you'll still want to reach inside to attach the backing washers, so leave stuffing until after the eyes are placed and only pack the rest in once they're secure.

Ears (black, make 2)
- Magic ring, 6 sc into the ring. (6)
- Inc around. (12)
- (sc, inc) x 6. (18)
- Sc around, no increases. (18)
- (sc, dec) x 6. (12)
- Dec around. (6)
Fasten off, leaving a long tail for sewing. Don't stuff the ears — flatten them instead, so they sit against the head as a curved half-circle rather than a stuffed dome. Set both aside until assembly.
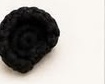
Eye patches (black, make 2)
- Magic ring, 6 sc into the ring. (6)
- Inc around. (12)
- (sc, inc) x 6. (18)
Fasten off, leaving a long tail for sewing. Leave these flat and unstuffed too — they're sewn on top of the finished face as a flat black disc, positioned around each safety eye, not as a 3-D piece.
Tip: use a stitch marker to keep track of your rounds — with five separate pieces built from nearly identical magic-ring starts, it's easy to lose count of which round you're on if a piece gets set down mid-row.
Arms (black, make 2)
- Magic ring, 6 sc into the ring. (6)
- Inc around. (12) 3–8. Sc around, no increases. (12) — repeat for 6 rounds, building the arm's length before shaping the end.
- (2 sc, dec) x 3. (9) — sc across 2 stitches, then decrease, repeated 3 times to start narrowing the tip. 10–16. Sc around, no increases. (9) — repeat for 7 rounds.
Stuff lightly — arms read as more natural when they're soft rather than firmly packed, since a panda's arms drape rather than stand rigid.
- (sc, dec) x 3. (6)
Fasten off, leaving a long tail for sewing.
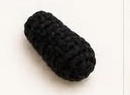
Legs (black, make 2)
- Magic ring, 6 sc into the ring. (6)
- Inc around. (12)
- (sc, inc) x 6. (18)
- (2 sc, inc) x 6. (24) 5–8. Sc around, no increases. (24) — repeat for 4 rounds, giving the leg enough height to support the sitting pose.
- (2 sc, dec) x 6. (18) 10–13. Sc around, no increases. (18) — repeat for 4 rounds.
Stuff firmly this time — unlike the arms, the legs need to hold their shape and bear the panda's weight when it's posed sitting up.
- (sc, dec) x 6. (12)
- Dec around. (6)
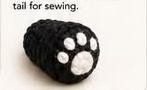
Fasten off, leaving a long tail for sewing. The white toe pads (below) get added to the front of each leg once the panda is fully assembled.
Body (white)
- Magic ring, 6 sc into the ring. (6)
- Inc around. (12)
- (sc, inc) x 6. (18)
- (2 sc, inc) x 6. (24)
- (3 sc, inc) x 6. (30) 6–10. Sc around, no increases. (30) — repeat for 5 rounds; this straight section is what gives the body its rounded barrel shape rather than a tapered cone.
Stuff firmly as you close the top, so the body holds its shape once the head is sewn on and won't collapse under that weight.
- (3 sc, dec) x 6. (24)
- (2 sc, dec) x 6. (18)
- (sc, dec) x 6. (12)
- Dec around. (6)
Fasten off, leaving a long tail for sewing.

Nose (black)
- Magic ring, 4 sc into the ring. (4)
- Inc around. (8)
Fasten off, leaving a long tail for sewing. This small dome sits at the center of the face between the eyes, standing in for the embroidered nose that simpler panda patterns use — it gives a slightly more sculpted, 3-D muzzle.

Paw pads (white)
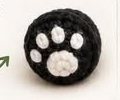
Embroider or crochet small toe pads onto the front of each paw (the legs, and optionally the arms if you want front paws detailed too): one large pad centered lower on the foot, plus three small pads in a row above it, mimicking the shape of a real paw print. The simplest approach is a few straight or satin stitches in white yarn worked directly onto the black leg piece after stuffing — no separate crocheted piece is required, though a tiny flattened circle of white yarn (magic ring, 4–5 sc, fasten off) sewn on in the same layout works too if you'd rather crochet them.
Assembly
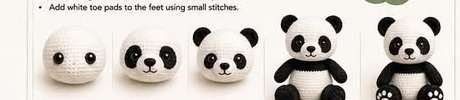
Work in this order — each step is easier while the piece before it is still bare, and gets harder to place accurately the more is already sewn on:
- Sew the ears to the top of the head, spaced apart the way a real panda's rounded ears sit, angled slightly outward.
- Sew the eye patches around the eyes — center each black patch over a safety eye so the eye sits roughly in the middle of the patch, angled slightly outward to match the ears.
- Sew the nose between the eyes, just below the center point, sitting slightly forward on the face.
- Embroider the mouth in black yarn or floss — a simple "Y" shape works well: one short stitch down from the base of the nose, then two short stitches branching out to either side.
- Sew the head to the body, centering it so the panda's face points forward.
- Sew the arms to the sides of the body, just below the head.
- Sew the legs to the bottom front of the body, positioned so the panda balances and sits upright on its own.
- Add the white toe pads to the feet using small stitches, following the layout described above.
Weave in every remaining tail once assembly is done.
Finished size
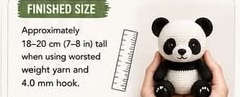
This panda finishes at approximately 18–20cm (7–8in) tall when worked in worsted weight yarn on a 4.0mm hook. Going up or down a hook size will scale the finished panda slightly larger or smaller without changing the pattern itself — a 3.5mm hook produces a firmer, somewhat smaller panda closer to the original amigurumi panda's size.
Tips for success
- Use a tight, consistent stitch for neat results — a looser gauge shows gaps between stitches on a piece this size, more visibly than on smaller amigurumi.
- Stuff as you go, a little at a time, rather than waiting until a piece is closed. It's much easier to smooth out lumps while there's still an opening to work through.
- Count your stitches at the end of every round, especially through the increase and decrease sections — an off-by-one error compounds over 17 rounds on the head.
- Take your time. Five separate black pieces (ears, eye patches, arms, legs, nose) plus the two-color head and body is a real project, not a quick 20-minute make — plan for it across more than one sitting.
If the magic-ring starts or the invisible-decrease shaping here are new to you, the magic ring tutorial and the amigurumi bunny pattern both walk through the same techniques in more detail, on simpler single-color pieces.
Frequently Asked Questions
Why is this panda so much bigger than other amigurumi panda patterns? The larger finished size comes from a combination of worsted weight yarn (heavier than the DK or sport weight many amigurumi use), a 4.0mm hook, and a head worked through 17 rounds instead of a more typical 12–14 — more rounds of straight single crochet between the increase and decrease sections means more height and width on the finished piece.
Do I need a separately crocheted nose, or can I embroider it instead? Either works. The crocheted nose piece described above gives a slightly raised, 3-D muzzle, but a simple embroidered oval or triangle in black yarn sewn directly onto the face is a fine substitute if you'd rather skip one more small piece.
Can I skip the paw pads? Yes — the panda holds together and sits fine without them. They're a detail that adds realism, not a structural part of the pattern, so leave them off for a faster make or add them afterward once you've decided you like the finished panda enough to invest the extra time.
Why won't my panda sit upright on its own? Check that the legs are stuffed firmly (unlike the lightly-stuffed arms) and are sewn to the bottom front of the body rather than the sides — a panda with legs mounted too high or too loosely stuffed tends to tip backward or to one side instead of balancing.
What size safety eyes work best, and are they safe for young children? This pattern uses 10mm safety eyes, which read well at this larger scale without overwhelming the face. As with any small hardware, safety eyes are a choking hazard for children under 3, so substitute embroidered eyes in black yarn or floss for any panda intended for a very young child or a household pet.
Keep going
- 01Crochet Raccoon Pattern (Amigurumi, 7–8in)A bottom-up body with a built-in cream belly stripe, a striped tail worked in alternating color bands, and oval eye masks made from a foundation chain instead of a magic ring — more construction variety than most first amigurumi projects.amigurumi10 min read
- 02Crochet Penguin Pattern (Beginner Friendly, Chenille Yarn)A soft, plush penguin made in chenille yarn instead of the usual worsted cotton — the head and body work as one continuous piece, so there's no seam down the middle to line up.amigurumi9 min read
- 03Crochet Bucket Hat Pattern (Adult Sizes, One Skein)The rounded crown, straight sides, and flared brim that make a bucket hat instantly recognizable — worked flat-to-flare in single crochet, with the stitch counts spelled out so it actually turns out symmetrical.wearables6 min read