amigurumi · free-pattern · beginner · 9 min read
Crochet Penguin Pattern (Beginner Friendly, Chenille Yarn)
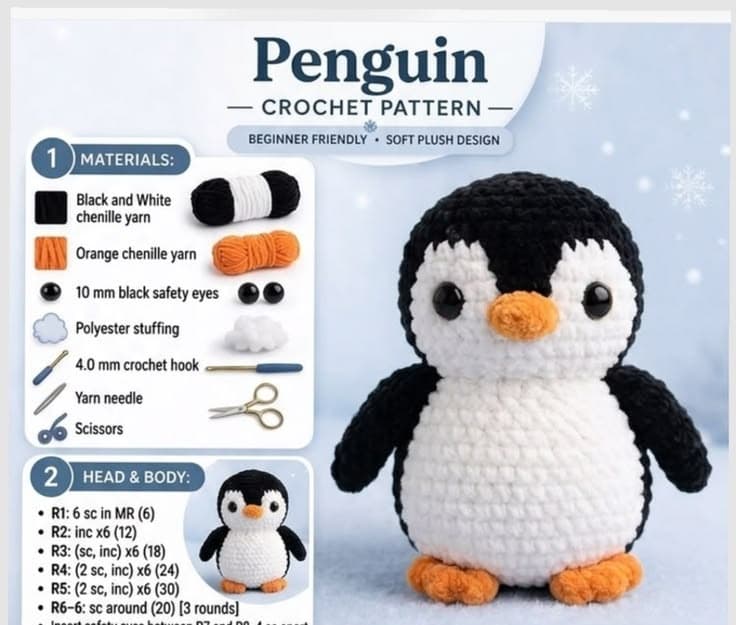
Most amigurumi build a head and a body as two separate pieces and sew them together afterward, the way the amigurumi panda does. This penguin skips that seam entirely — the head and body are worked as one continuous spiral from a single magic ring, so the only assembly is attaching the smaller pieces (beak, flippers, feet, belly patch) to a body that's already whole. It's also worked in chenille yarn rather than the worsted cotton or acrylic most amigurumi use, which is what gives the finished penguin its soft, fuzzy, plush-toy texture instead of a crisp stitch-defined surface.
Abbreviations
- mr — magic ring
- sc — single crochet
- inc — increase (2 sc in next stitch)
- dec — decrease (invisible: sc2tog)
- st(s) — stitch(es)
- R — round
- ( ) — work the instructions inside the parentheses into the same stitch
- [ ] — repeat the instructions inside the brackets the number of times given
Materials
- Black and white chenille yarn (for the head, body, and flippers)
- Orange chenille yarn (for the beak and feet)
- 10mm black safety eyes
- Polyester fiberfill stuffing
- 4.0mm crochet hook
- Yarn needle
- Scissors
Head & body (one continuous piece)
Work in continuous rounds, without joining or turning. This single piece grows from the top of the head down through the shoulders and belly, so there's no separate body piece to make or seam later.
- Magic ring, 6 sc into the ring. (6)
- Inc around. (12) — 2 sc into every stitch from round 1.
- (sc, inc) x 6. (18)
- (2 sc, inc) x 6. (24)
- (3 sc, inc) x 6. (30) — the widest point of the head. 6–7. Sc around, no increases. (30) — repeat for 2 rounds, building the head's roundness before you start narrowing toward the neck.
Insert the safety eyes now, before the opening narrows too much to reach through comfortably — place them between rounds 7 and 8, spaced about 4 stitches apart on either side of center.
- (3 sc, dec) x 6. (24) — sc across 3 stitches, then work an invisible decrease over the next 2 to merge them into one; repeat 6 times.
- Sc around, no increases. (24)
- (2 sc, dec) x 6. (18) 11–13. Sc around, no increases. (18) — repeat for 3 rounds. This straight stretch is what gives the lower half its rounder, body-like proportions instead of tapering straight into a point. Begin stuffing firmly through here, packing a little more in with each round as the opening allows.
- (sc, dec) x 6. (12)
- Dec around. (6)
Stuff the last of the fiberfill in firmly and fasten off, weaving the tail through the final 6 stitches to close the opening.
Beak (make 1, orange)
- Magic ring, 6 sc into the ring. (6)
- Inc around. (12)
- (sc, inc) x 6. (18)
- (2 sc, inc) x 6. (24) 5–6. Sc around, no increases. (24) — repeat for 2 rounds, giving the beak enough depth to hold its shape once stuffed.
Stuff firmly — the beak should feel solid, since it's a small piece that takes a lot of handling once the toy is finished. Fasten off, leaving a long tail for sewing.
Flippers (make 2, black)
- Magic ring, 6 sc into the ring. (6)
- Inc around. (12)
- (sc, inc) x 6. (18)
- (2 sc, inc) x 6. (24) 5–7. Sc around, no increases. (24) — repeat for 3 rounds, extending the flipper into its finished length.
- (2 sc, dec) x 6. (18)
Stuff lightly — a soft, only lightly-filled flipper drapes against the body the way a real penguin's flipper does, rather than sticking straight out. Fasten off, leaving a long tail for sewing, and flatten the piece slightly before attaching it.

Feet (make 2, orange)
- Magic ring, 6 sc into the ring. (6)
- Inc around. (12)
- (sc, inc) x 6. (18)
- (2 sc, inc) x 6. (24) 5–6. Sc around, no increases. (24) — repeat for 2 rounds.
- (2 sc, dec) x 6. (18)
Stuff lightly. Fasten off, leaving a tail for sewing.
Belly patch (make 1, white)
- Magic ring, 6 sc into the ring. (6)
- Inc around. (12)
- (sc, inc) x 6. (18)
- (2 sc, inc) x 6. (24) 5–7. Sc around, no increases. (24) — repeat for 3 rounds.
Fasten off, leaving a tail for sewing. Leave this piece flat and unstuffed — like the eye patches on the amigurumi panda, it's sewn on top of the finished body as a flat oval, not stuffed as a 3-D shape.

Face details
Once the safety eyes are seated and the beak is ready, the face comes together with just those two elements plus the surrounding black-and-white color blocking already built into the head. If you'd like extra definition around the eyes, a few short straight stitches in black yarn just above each eye read as a soft brow line without adding a separate crocheted piece.
Assembly
Because the head and body are already one piece, assembly here is mostly attaching the smaller parts rather than joining large ones:
- Sew the beak to the center of the face, positioned just below and between the eyes.
- Sew the belly patch to the front of the body, centered below the beak so it covers the lower half of the white area.
- Sew the flippers to the sides of the body, at about the same height as the eyes, angled slightly toward the back.
- Sew the feet to the bottom of the body, positioned so the penguin balances and stands upright on its own.
- Weave in every remaining tail.
If you'd like to add a small tail for extra stability when the penguin stands, work a flattened black circle (magic ring, 6 sc, inc around, fasten off without stuffing) and sew it to the back of the body, just above the feet.
Notes on the chenille texture
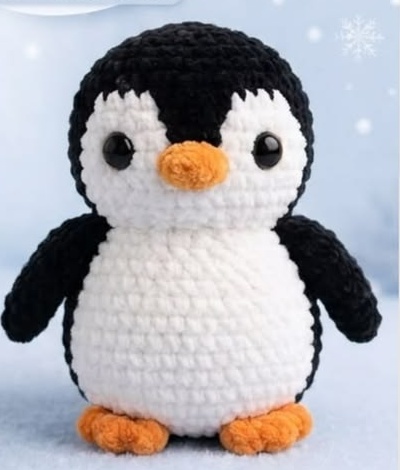
Chenille yarn is what gives this penguin its soft, fuzzy, almost velvety surface instead of the more defined stitch texture you'd get from cotton or acrylic worsted weight — the trade-off is that individual stitches are harder to see and count as you work, so lean more on a stitch marker and less on eyeballing your rounds. The color blocking (black head and back, white front, orange beak and feet) happens entirely between pieces, not through mid-round color changes, so there's no color-work technique required beyond simply crocheting each piece in its own color.
Tips for success
- Chenille yarn splits more easily than smooth worsted yarn — work with shorter lengths and check your hook is fully catching the yarn on every stitch, not just the outer fibers.
- Stuff the head-and-body piece gradually as you go rather than all at once at the end; with one long continuous piece, it's much easier to distribute stuffing evenly in stages than to pack it all in through a small final opening.
- Use a stitch marker in the first stitch of every round on the head-and-body piece — at 15 rounds, it's the easiest piece on which to lose track of where a round starts.
- Attach the safety eyes before you've stuffed too much of the head; you'll need to reach inside to fit the backing washers securely.
If magic rings or invisible decreases are new to you, the magic ring tutorial and the amigurumi bunny pattern both cover the same techniques in more detail on simpler single-color pieces.
Frequently Asked Questions
Can I make this penguin with regular worsted weight yarn instead of chenille? Yes — the pattern works the same way with any worsted weight yarn on a 4.0mm hook. You'll get a more defined, textured stitch look rather than the soft fuzzy finish chenille gives, and chenille's tendency to split won't be a factor, so it's actually a slightly easier substitution for a first-time amigurumi maker.
Why are the head and body one piece instead of two? Working them as a single continuous spiral removes one seam from the project — there's no head-to-body join to line up symmetrically, which is one less place for a lopsided result. The trade-off is a longer uninterrupted stretch of rounds (15 in total) before you get to fasten off and move to a new piece.
How much yarn does a penguin like this use? Expect roughly 40–50g of black-and-white chenille for the head and body combined, plus a small amount of orange (10–15g) for the beak and feet — chenille's thicker profile means it uses noticeably more yardage per piece than a comparable worsted cotton amigurumi.
Is this pattern safe for a young child or a pet? The 10mm safety eyes are a choking hazard for children under 3 and for small pets that chew — substitute embroidered eyes in black yarn or floss for any penguin intended for either. Chenille yarn itself sheds more fibers than smooth yarns over time, so it's worth an occasional check that stitches and seams are still holding tight with regular handling.
Why won't my penguin stand up on its own? Check that the feet are stuffed and sewn flat to the bottom of the body rather than at an angle — a penguin with feet mounted even slightly sideways will tend to tip. Firming up the stuffing in the lower rounds of the body (13–15) also helps, since a softer base makes balancing harder regardless of how the feet are attached.
Keep going
- 01Crochet Raccoon Pattern (Amigurumi, 7–8in)A bottom-up body with a built-in cream belly stripe, a striped tail worked in alternating color bands, and oval eye masks made from a foundation chain instead of a magic ring — more construction variety than most first amigurumi projects.amigurumi10 min read
- 02Crochet Panda Pattern (Sitting Amigurumi, 18–20cm)A bigger, more detailed panda than most beginner patterns — a two-tone head with eye patches, a separate nose, and toe-pad paws that make it sit up on its own. Single crochet throughout, worsted weight yarn.amigurumi11 min read
- 03Crochet Bucket Hat Pattern (Adult Sizes, One Skein)The rounded crown, straight sides, and flared brim that make a bucket hat instantly recognizable — worked flat-to-flare in single crochet, with the stitch counts spelled out so it actually turns out symmetrical.wearables6 min read