free-pattern · home-decor · beginner · 6 min read
Crochet Keychain Pattern (Scrap Yarn, 15 Minutes)
Keychains are the smallest genuinely useful thing you can crochet, which makes them the best place to use up the odd few yards of yarn left on a ball after a bigger project. All three versions below finish fast enough to make a whole batch for stocking stuffers or party favors in one sitting.
Materials (any version)
- Small amounts of worsted weight yarn
- 3.5–4.0mm hook
- A keyring or lobster-clasp keychain finding
- Yarn needle
- Polyester fiberfill (for the ball version only)
Abbreviations
- sc — single crochet
- inc — increase (2 sc in same stitch)
- dec — invisible decrease
- st(s) — stitch(es)
Version 1: Mini amigurumi ball
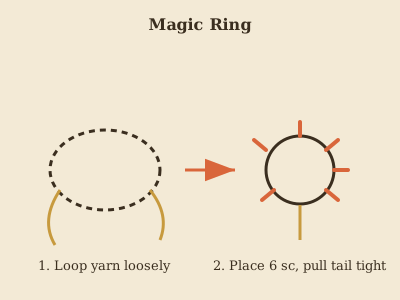
- Magic ring, 6 sc into ring, pull the tail to close. (6 sts)
 2. Inc in every stitch around: work 2 sc into each of the 6 stitches. (12 sts)
3. Work one plain round of sc with no increases. (12 sts) Repeat this same plain round 2 more times, for 3 rounds total — this is the round section that gives the ball its rounded body before it starts closing up.
4. Dec around: work an invisible decrease in place of every pair of stitches, all the way around. (6 sts) The ball should look noticeably smaller and start cupping inward at this point, ready to close.
2. Inc in every stitch around: work 2 sc into each of the 6 stitches. (12 sts)
3. Work one plain round of sc with no increases. (12 sts) Repeat this same plain round 2 more times, for 3 rounds total — this is the round section that gives the ball its rounded body before it starts closing up.
4. Dec around: work an invisible decrease in place of every pair of stitches, all the way around. (6 sts) The ball should look noticeably smaller and start cupping inward at this point, ready to close.
Stuff the ball lightly at this stage, before the opening closes any further, working small pieces of fiberfill in through the remaining gap. Fasten off, leaving a long tail. Thread the tail through the last few stitches of the opening to close it fully, then use the same tail to make a small loop of yarn (or attach a metal jump ring instead), and attach the keyring finding to that loop.
Version 2: Flower keychain
Use the flower appliqué pattern at its normal small size. Instead of sewing it onto a project, sew a small fabric or crochet loop to the back of the finished flower and attach a keyring finding through the loop. This is the fastest of the three versions if you've already got flower-making muscle memory from that pattern.
Version 3: Simple tassel
- Cut 8–10 strands of yarn, each about 6 inches long.
- Fold the bundle in half and loop it through a keyring finding.
- About half an inch below the fold, wrap a separate strand of yarn tightly around the bundle 5–6 times and tie it off securely — this forms the tassel's "neck."
- Trim the loose ends even.
No crochet stitches at all in this version, but it pairs naturally with the other two as a hanging accent — a small tassel added below a crocheted ball or flower gives it more movement and visual weight.
Combining versions
A ball with a small tassel hanging beneath it, or a flower with the tassel technique used for extra fringe around its edge, both make a slightly more elaborate keychain from the same 20-minute time budget as the single-element versions above.
Gifting and selling notes
Keychains are genuinely one of the lowest-cost, highest-perceived-value handmade items to give or sell — a finished piece uses only a few yards of yarn but reads as a real, complete gift rather than a scrap. If you're making a batch, working all the amigurumi balls first, then all the flowers, keeps you from having to switch mental gears between two different construction methods every piece.
Durability for everyday use
A keychain gets more friction and handling than almost anything else you'll crochet — it lives in a pocket or bag, rattles against keys, and gets picked up by its finding dozens of times a day. Cotton or a cotton-blend yarn holds up to that wear noticeably better than a soft, fuzzy acrylic, which tends to pill and flatten with regular handling. Stuff the amigurumi ball version a little firmer than you would a plushie meant for gentle holding — a softer fill compresses out of shape faster under the repeated squeeze of being pulled in and out of a bag.
Attaching the hardware securely
Whichever version you make, the keyring attachment point is the one spot on the whole project that takes real, repeated strain, so it's worth reinforcing beyond a single strand of yarn. Doubling the yarn for the small connecting loop, or passing the yarn needle through the attachment point two or three times before tying off, makes a meaningful difference in how long the keychain survives daily use compared to a single thin pass.
For a keychain-sized project with more personality than a ball or flower, a shrunk-down version of the amigurumi doll — worked with a finer yarn and smaller hook than the original pattern calls for — makes a genuinely tiny doll charm using the same instructions.
Frequently Asked Questions
What's the fastest keychain style to make for a large batch? The mini amigurumi ball is the fastest of the three — four short rounds with no shaping decisions beyond a single increase and decrease round, which makes it easy to crochet on autopilot while making a dozen for a craft fair or party favors.
Can I sell crochet keychains made from a pattern like this? Yes — a pattern being free to use for your own projects generally includes selling finished items made from it, though it's worth double-checking any individual pattern's specific terms if you plan to sell in volume. This pattern places no restriction on selling what you make from it.
How do I keep small amigurumi pieces from unraveling on a keyring? Weave the finishing tail through several stitches in at least two different directions before trimming, rather than a single pass — a keychain gets pulled and jostled more than almost any other crochet item, and a lightly-secured tail is the first thing to work loose.
Keep going
- 01Halloween Monster Mug Cozy Pattern (One-Eyed and Friendly)The same ribbed tube as the everyday mug cozy, dressed up with a googly eye, two felt fangs, and a pair of horns — a seasonal novelty piece that finishes in under an hour.home-decor6 min read
- 02Easy Cotton Dishcloth Pattern (A Perfect First Project)Nine inches of cotton, one stitch repeated, two evenings tops. The dishcloth is the traditional first crochet project for good reason — here's the pattern plus every trick for a square, even one.home-decor6 min read
- 03Crochet Market Tote Bag Pattern (Holds a Full Grocery Run)A flat base, straight sides worked in the round, and sturdy cotton yarn — a grocery-run tote that actually holds weight, not a decorative bag that stretches out of shape by the second trip.home-decor6 min read