amigurumi · free-pattern · 5 min read
Amigurumi Panda Pattern (Beginner Friendly)
A panda looks like an advanced color-work project until you realize it's really just the amigurumi bunny's body shapes in two colors instead of one, plus a pair of flat eye patches sewn on afterward. No color changes mid-round, no intarsia — every color swap happens between pieces, not inside a stitch.
Abbreviations
- sc — single crochet
- inc — increase (2 sc in same stitch)
- dec — invisible decrease
- st(s) — stitch(es)
Materials
- Worsted weight yarn in white (or cream) and black
- 3.5mm crochet hook
- Small amount of black yarn or safety eyes, for the face
- Polyester fiberfill
- Yarn needle
- Stitch marker
Head (white, make 1)
- Magic ring, 6 sc into ring (6)
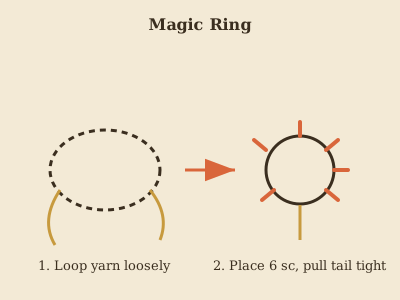
- Inc around (12) — work 2 sc into each of the 6 stitches from round 1, doubling the count.
- sc, inc around, repeating (18) — sc in the next stitch, then work 2 sc in the following stitch, and repeat that two-stitch pair all the way around.
- sc 2, inc around, repeating (24) — same idea, but sc across 2 stitches before each increase this time.
- sc 3, inc around, repeating (30) — sc across 3 stitches before each increase; the piece should now be curving into a visible dome shape. 6–12. sc around, no increases (30), repeat for 7 rounds — single crochet in every stitch with no increases, so the head grows taller rather than wider for these 7 rounds.
- sc 3, dec around, repeating (24) — sc across 3 stitches, then work an invisible decrease over the next 2 stitches to join them into one; begin stuffing firmly now, while the opening is still wide enough to stuff through easily.
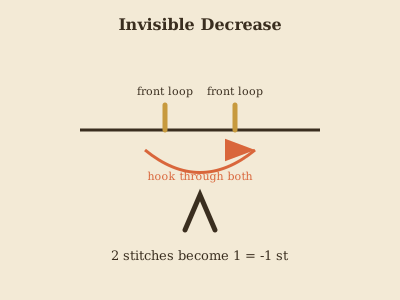 14. sc 2, dec around, repeating (18)
15. sc, dec around, repeating (12)
16. dec around (6) — decrease every remaining stitch pair; the opening should now be small enough to close with just a few stitches.
14. sc 2, dec around, repeating (18)
15. sc, dec around, repeating (12)
16. dec around (6) — decrease every remaining stitch pair; the opening should now be small enough to close with just a few stitches.
Fasten off, leaving a long tail to close.
Body (white, make 1)
Work rounds 1–4 the same as the head (24 sts), then sc around with no increases for 8 rounds, letting the body grow into a taller cylinder before you start shaping the bottom. Decrease the same way as the head's rounds 13–16, stuffing before closing so the piece holds its shape once sewn to the head.
Ears (black, make 2)
- Magic ring, 5 sc into ring (5)
- sc around, no increases (5), repeat for 2 rounds
Flatten (no stuffing) and sew to the top of the head, spaced apart like a real panda's rounded ears.
Eye patches (black, make 2)
- Magic ring, 6 sc into ring (6)
- Inc around (12)
Flatten and set aside — these get sewn flat onto the face, not stuffed.
Arms (black, make 2)
- Magic ring, 5 sc into ring (5)
- sc around, no increases (5), repeat for 6 rounds
Leave unstuffed or lightly stuffed for a soft, floppy arm. Fasten off, leaving a tail for sewing.
Legs (black, make 2)
Work the same as the arms, but for 4 rounds instead of 6 — pandas read as more accurate with slightly shorter legs than arms.
Assembly
Sew the eye patches onto the face first, angled slightly outward like real panda markings, before adding anything else — they're much easier to place symmetrically on a bare head. Add small embroidered or safety eyes in the center of each black patch. Sew the ears to the top of the head, the arms to the upper sides of the body, and the legs to the lower body so the panda can sit upright. Finally, sew the head to the body and weave in every remaining tail.
Notes on the two-tone look
Because every color change happens at a fasten-off, not mid-stitch, there's no yarn-carrying or color-jog to manage anywhere in this pattern — the entire "difficulty" of a two-color amigurumi is just keeping five separate small pieces organized while you crochet them. Do the ears, eye patches, arms, and legs in a batch before starting the head and body, and assembly goes much faster with everything already on hand.
If the increase-and-decrease rhythm above ever loses you, the magic ring tutorial walks through exactly this round-by-round shaping in more detail.
Frequently Asked Questions
Why is my panda's head too big or too small compared to the body? Check your gauge is consistent between pieces — a looser tension on one piece and tighter on another is the most common cause. If both pieces used the same hook and yarn but still mismatch, work one extra round of increases (or one fewer) on whichever piece came out smaller before fastening off.
Can I make this panda without safety eyes? Yes — embroidered eyes with black yarn or embroidery floss are a fine substitute and are safer for a toy intended for a very young child, since they can't be pulled loose the way a safety eye's washer occasionally can if not seated firmly.
How much yarn does a panda like this actually use? Roughly 40–50g of white and 20–25g of black for a panda finishing at about 5–6 inches tall with worsted weight yarn — small enough that most crocheters already have enough of both colors in their stash without a special trip for yarn.
Keep going
- 01Crochet Raccoon Pattern (Amigurumi, 7–8in)A bottom-up body with a built-in cream belly stripe, a striped tail worked in alternating color bands, and oval eye masks made from a foundation chain instead of a magic ring — more construction variety than most first amigurumi projects.amigurumi10 min read
- 02Crochet Panda Pattern (Sitting Amigurumi, 18–20cm)A bigger, more detailed panda than most beginner patterns — a two-tone head with eye patches, a separate nose, and toe-pad paws that make it sit up on its own. Single crochet throughout, worsted weight yarn.amigurumi11 min read
- 03Crochet Penguin Pattern (Beginner Friendly, Chenille Yarn)A soft, plush penguin made in chenille yarn instead of the usual worsted cotton — the head and body work as one continuous piece, so there's no seam down the middle to line up.amigurumi9 min read