amigurumi · free-pattern · beginner · 8 min read
Crochet Tom Keychain Pattern (Amigurumi, ~10cm)
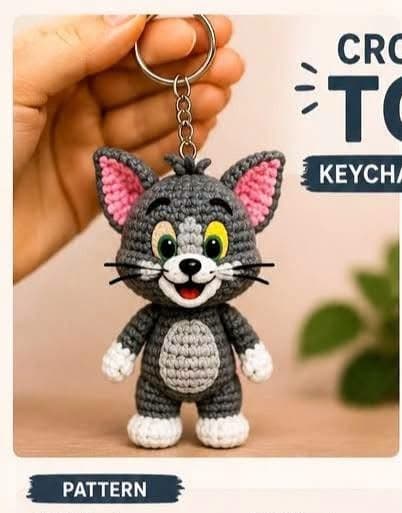
This is a fan-made pattern inspired by the classic cartoon cat Tom, not an officially licensed design — the character is a trademark of Warner Bros. It's shared here as a personal-use amigurumi tutorial, the way many fan-made character keychains are. Construction-wise, it's the same magic-ring shaping used throughout this site's amigurumi, just at a much finer gauge than the general keychain patterns — a 2.0mm hook instead of the usual 3.5–4.0mm, which is what keeps a whole cat small enough to actually hang from a keyring. The source pattern only photographed the finished piece, not each part before assembly, so the piece photos below are close-ups taken from that finished photo rather than separate studio shots — a good reference for shaping and color placement, even without a dedicated photo per step.
Abbreviations
- MR — magic ring
- sc — single crochet
- inc — increase (2 sc in one stitch)
- dec — decrease (2 sc together)
- sl st — slip stitch
- ch — chain
- ( ) — repeat the instructions inside the parentheses the number of times given
Materials
- Gray, white, pink, black, yellow, and red yarn
- 2.0mm crochet hook
- 6mm safety eyes
- Polyester fiberfill
- Yarn needle
- Scissors
- Keychain ring
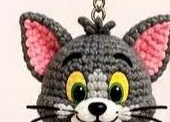
Head (gray)
Work in continuous rounds, without joining or turning.
- Magic ring, 6 sc into the ring. (6)
- Inc around. (12)
- (sc, inc) x 6. (18)
- (2 sc, inc) x 6. (24)
- (3 sc, inc) x 6. (30) — the head's widest point. 6–12. Sc around, no increases. (30) — repeat for 7 rounds, giving the head its rounded height before you start closing it.
Attach the safety eyes between rounds 8 and 9, while the opening is still wide enough to reach through comfortably for the backing washers.
- (3 sc, dec) x 6. (24) — sc across 3 stitches, then work a decrease over the next 2 to merge them into one; repeat 6 times.
- (2 sc, dec) x 6. (18)
- (sc, dec) x 6. (12)
- Dec around. (6)
Stuff firmly as the opening narrows, then fasten off and close.
Body (gray)
- Magic ring, 6 sc into the ring. (6)
- Inc around. (12)
- (sc, inc) x 6. (18)
- (2 sc, inc) x 6. (24) 5–10. Sc around, no increases. (24) — repeat for 6 rounds.
- (2 sc, dec) x 6. (18)
- Sc around, no increases. (18) — one round, giving the shoulders a slight taper before the final narrowing.
- (sc, dec) x 6. (12)
- Dec around. (6)
Stuff firmly and fasten off.

Ears (make 2)
Worked as a flat two-tone disc: gray on the outside, pink on the inside, folded together at the end rather than stuffed.
- Magic ring, 4 sc into the ring. (4)
- Inc around. (8)
- (sc, inc) x 4. (12) 4–5. Sc around, no increases. (12) — repeat for 2 rounds, in gray.
Change to pink yarn.
6–7. Sc around, no increases. (12) — repeat for 2 rounds.
Fold the disc in half so the gray rounds form the outer curve and the pink rounds show as the inner ear, then single crochet through both layers to close the fold. Fasten off.

Arms (make 2)
A plain straight tube with a color change near the tip, folded flat rather than shaped with increases or decreases.
- Magic ring, 6 sc into the ring. (6) 2–8. Sc around, no increases. (6) — repeat for 7 rounds, in gray.
Change to white yarn.
9–12. Sc around, no increases. (6) — repeat for 4 rounds, for the white paw.
Fold the tube flat and single crochet through both layers to close the end. Fasten off.

Legs (make 2)
- Magic ring, 6 sc into the ring. (6)
- Inc around. (12) 3–4. Sc around, no increases. (12) — repeat for 2 rounds, in gray.
Change to white yarn.
5–7. Sc around, no increases. (12) — repeat for 3 rounds, for the white foot.
Fasten off. Fold flat and single crochet through both layers to close, the same way as the arms, if you'd like a fully finished tube before sewing it on.

Assembly
- Sew the ears onto the top of the head, pink sides facing forward.
- Sew the arms to the sides of the body, and the legs to the bottom.
- Embroider the eyebrows, nose, mouth, and whiskers in black yarn, using the finished photo below as a placement guide.
- Sew the head to the body.
- Attach the keychain ring to the top of the head.
The source pattern's assembly notes also mention sewing on a tail, but no tail piece is included in the written pattern, and the finished design shown doesn't have a visible one — safe to skip.
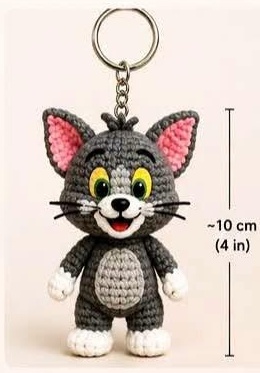
Finished size
This keychain finishes at approximately 10cm (4in) tall, worked at the fine 2.0mm gauge specified. Sizing up to a 3.0–3.5mm hook with a slightly heavier yarn will produce a noticeably bigger, sturdier version, closer in scale to the amigurumi panda — though at that size it stops being practical as an actual keychain and works better as a small shelf amigurumi instead.
Tips for success
- At 2.0mm, tension matters more than usual — a loose stitch here shows as a visible gap on a piece this small, in a way it wouldn't on a larger worsted-weight amigurumi.
- Attach the safety eyes before stuffing the head fully; you'll need to reach inside to seat the backing washers securely.
- Fold-and-close pieces (ears, arms, legs) go faster if you crochet all of them before starting assembly, so you're not switching between shaping and sewing repeatedly.
- A keychain gets more handling than a shelf toy — reinforce the head-to-body seam and the keychain ring attachment point with a few extra passes of yarn.
If magic rings or working at a smaller gauge feel unfamiliar, the magic ring tutorial and the general crochet keychain patterns are both good places to build the base technique before tackling a full character at this scale.
Frequently Asked Questions
Is this an official Tom and Jerry pattern? No — this is an independent, fan-made amigurumi pattern inspired by the character's design. It isn't licensed or endorsed by Warner Bros., and it's shared here as a personal-use tutorial, the same way many fan-made crochet character patterns are.
Why does this pattern use such a small hook? A 2.0mm hook and correspondingly thin yarn are what keep the finished piece small and light enough to actually function as a keychain — roughly 10cm tall. The same stitch counts on a standard 4.0mm hook would produce a piece two to three times the size, better suited to a shelf display than a keyring.
Can I make this without safety eyes? Yes — embroidered eyes in black and yellow yarn or floss are a fine substitute, and they remove the one small-hardware component from an otherwise fully soft toy, which matters if this keychain will end up on a child's bag.
Is a crocheted keychain safe for a young child? The 6mm safety eyes and the metal keychain ring are both choking hazards for children under 3. For a keychain meant for a young child, substitute embroidered eyes and consider a soft fabric loop instead of a metal ring, and check the seams periodically since a keychain gets more handling and abrasion than a stationary toy.
How much yarn do I need for one keychain? Very little — at this gauge, a single small ball of gray covers the head, body, and ear/limb bases, with only a few yards each of white, pink, black, yellow, and red needed for the accents and face. It's a good project for using up scraps left over from a bigger amigurumi.
Keep going
- 01Crochet Pikachu Pattern (Amigurumi, Beginner Friendly)A single-color yellow body, four flat sc segments sewn into a lightning-bolt tail, and the same magic-ring shaping as every other amigurumi on this site — a quick, satisfyingly simple character make.amigurumi7 min read
- 02Crochet Raccoon Pattern (Amigurumi, 7–8in)A bottom-up body with a built-in cream belly stripe, a striped tail worked in alternating color bands, and oval eye masks made from a foundation chain instead of a magic ring — more construction variety than most first amigurumi projects.amigurumi10 min read
- 03Crochet Panda Pattern (Sitting Amigurumi, 18–20cm)A bigger, more detailed panda than most beginner patterns — a two-tone head with eye patches, a separate nose, and toe-pad paws that make it sit up on its own. Single crochet throughout, worsted weight yarn.amigurumi11 min read